Here is a nice tut i found,actually really nice.
1) Start off making your size.I like to keep most of my sigs at a traditional size,but for manips,you can use diff sizes as long as it works with your photo.Then the 1st thing I do is I got to filter>render>clouds.Make sure the colors are black and white(We will color them later on)
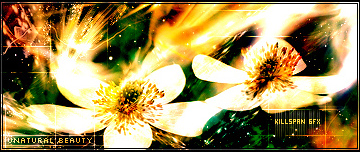
2) Now we are going to go photo searchin.Try to find a photo that you like,Something that you know will work well in a sig.That couls be just about everythin,from cars to nature,all the way to city streets.The only guidelines I would look for is that it's a good quality picture.For me I really like the nature style a lot so I used this photo of 2 flowers.
3) Cut the render out but don't do a square cut use the regular laso and try to cut a circle of the photo.Then hit ctrl+x and then ctrl+v to paste it in your sig.Try to find the right dimensions for the photo that fit in the sig.Now we are going to laso again but try to not get too close to the edges of the photo you cut,that way it will look smooth when you are done.
Now after you lasoed it again go to select>feather and make sure it's set to 20px andthen you hit ok.This will smooth out the laso even more.Then after thats done, you need to go to layer>add layer mask>reveal selection now it will looked blended in the sig as the pic shows.
4) Now I'm going to work on the brushing on the outsides of the photo.Try using colors that agree with the sig.I want to make this colorful,so I'm using some greens,yellows and oranges to make the work standout.
Ok now I started brushing using green color with rust and grunge.Then using diff layers I brushed using the yellow,orange and red.Keep in mind all of there layers are under soft light ,so they will not overpower one another.
As you do this,I would recommend duplicating your photo layer once or twice,in order for it to be more visible as we add one more colors.You dont want it to be hidden under all the color layers that get put on.after this is done,now try doing a color balance layers are above all the other layers so it will give it the color effect you desire.
5) Go to layer>new>adjusments layer>brightness and contrast.Raise the contrast up 5-10Using the abstract brushes I created light radiating off the flowers.
6) Do some more color balance layers and brightness and contrast then keep on brushing with the colors you want.
7) Put one text and borders.I used a 3px border use blur effects on texts.
8.The last thing I do is go over my sig and check if there is anything else I want to edit.
And finnaly it's done here is my result.


![[TUT] Flower Manipulation](https://www.consolediscussions.com/forum/staff/Member.png)


 Reply With Quote

Bookmarks